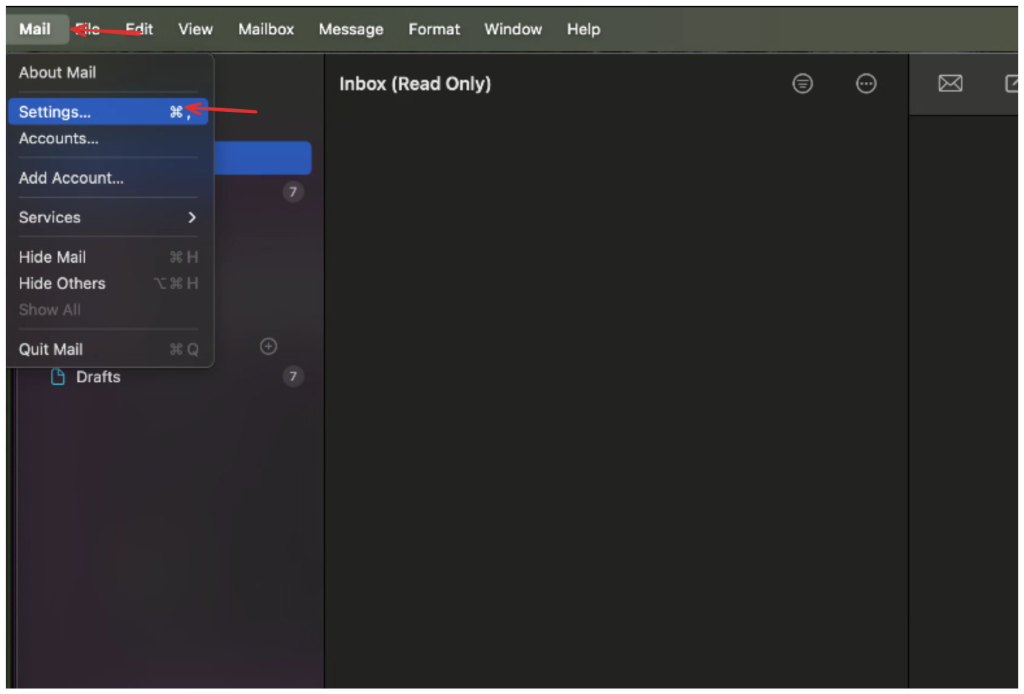
Select Mail from the menu at the top and choose Preferences.
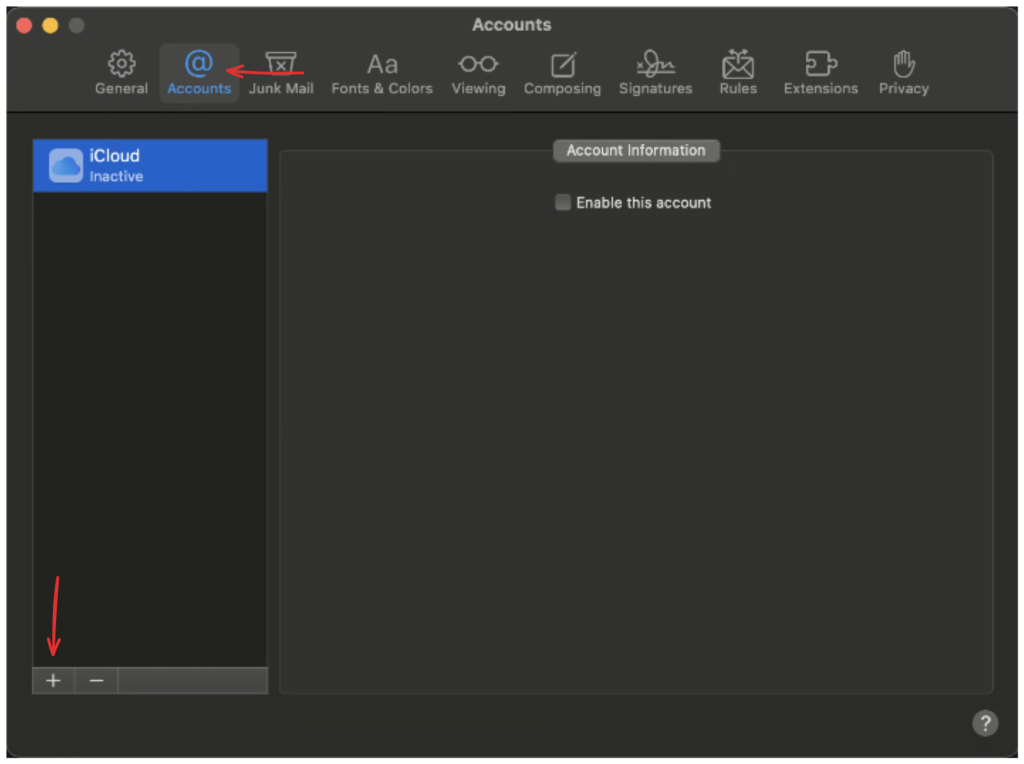
Press the + button in the lower left.
For Account Type, Select POP. Account Description: this can be anything from your e-mail address to your name, It’s just a label for future reference. Full Name: this should be what you would like people to see when you e-mail them. I.E., Your name, Company name, Nick name, etc. E-mail address: your full e-mail address. Press Continue.
Your Incoming mail server: needs to be mail.iinet.com Username: needs to be your full e-mail address Password: your password ** if you do not know this you can contact our technical support for assistance with this. Our contact information is located > HERE < ** Then press Continue.
Your Outgoing mail server: needs to be smtp.iinet.com Check the box that says Use Authentication Username: your full e-mail address. Password: your password Then press Continue.
Press Continue.
Press Done.
Press the Tab towards the top that says Advanced. Change the drop down box from After one week to Right away.
Now press the Red button in the upper left. If you are prompted to save press Yes.
1. Open up Mac Mail > Click “Mail” in bold font at the top left of the screen > then click “Settings”.
2. A menu will pop up. Select the “Accounts” tab > then select the “+” icon on the bottom left
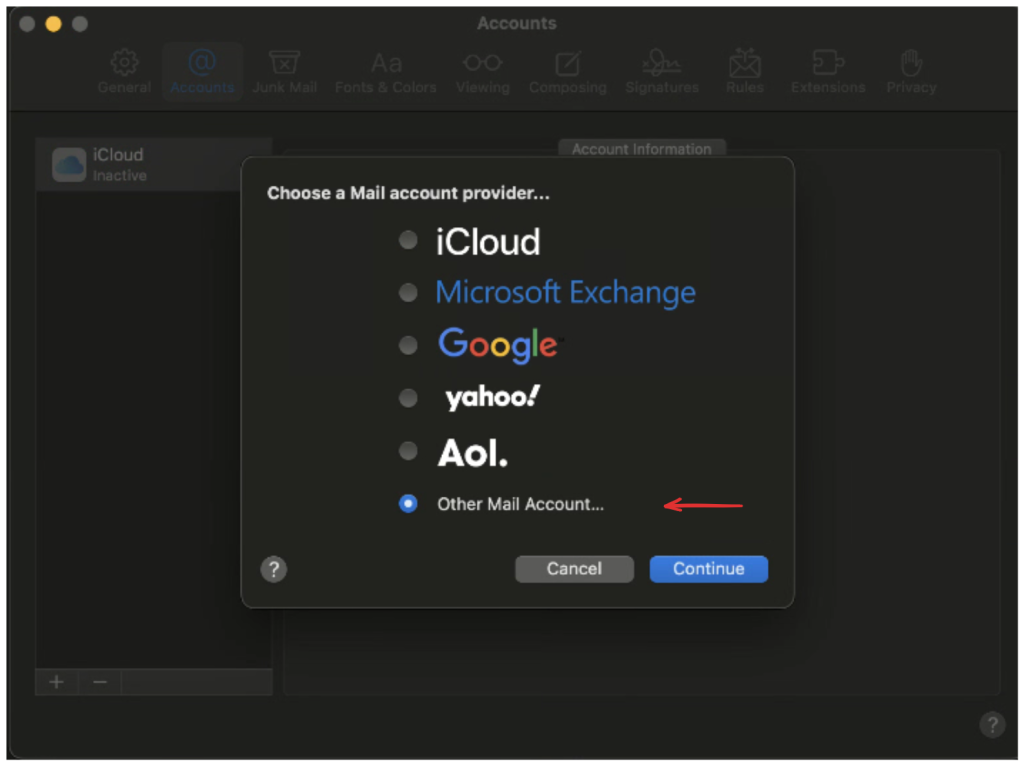
3. It will prompt you to choose a Mail account provider. Select “Other Mail Account…” (if you have an email ending in @easytreet.net then you will click on “Microsoft Exchange” instead of “Other Mail Account…” and follow the steps to set up your account) > Continue
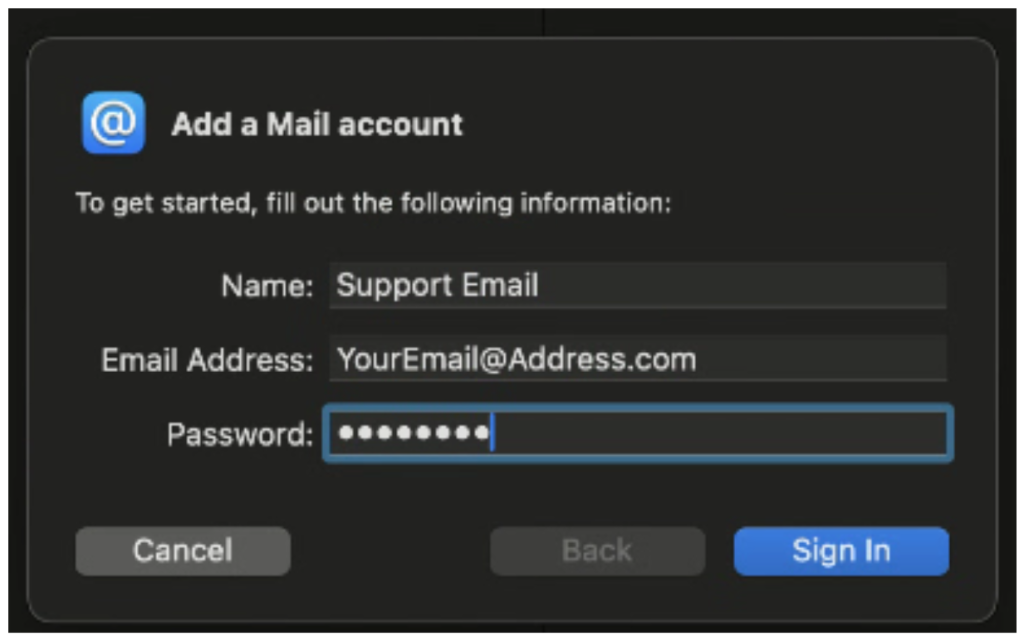
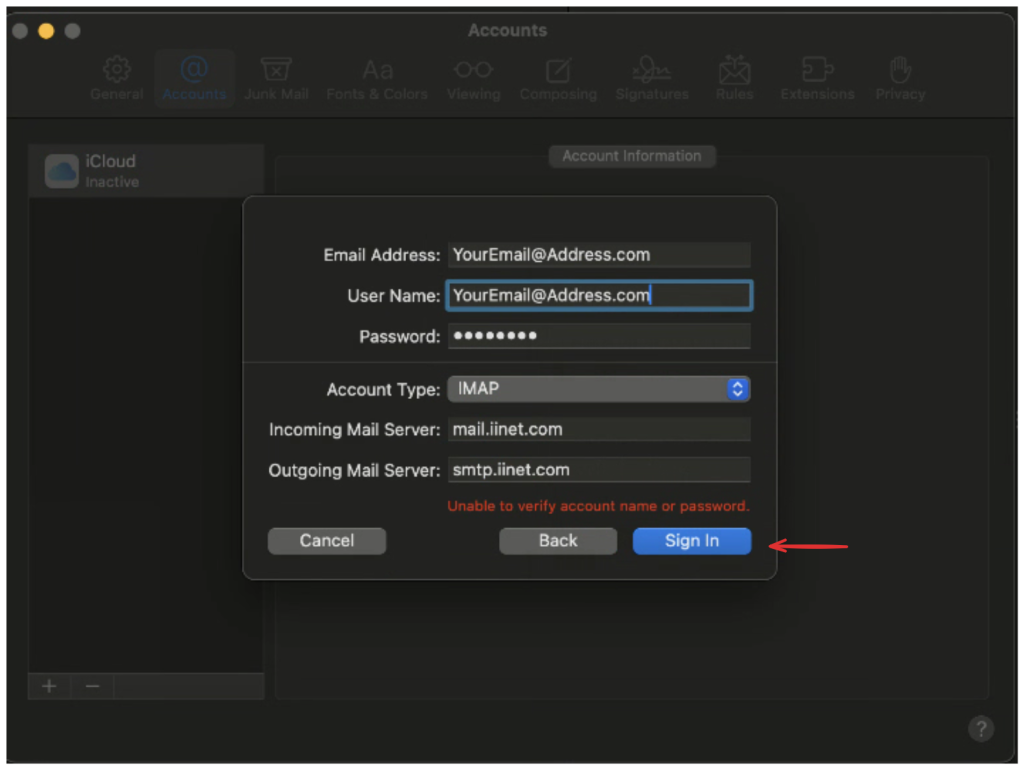
5. Fill out the necessary information as follows: – Name: your name – Email address: your full email address – Password: your password Sign In
6. Next it will ask for more information. Fill in the following to match: – Account type: POP or IMAP – Incoming Mail Server: mail.iinet.com – Outgoing Mail Server: smtp.iinet.com Sign In
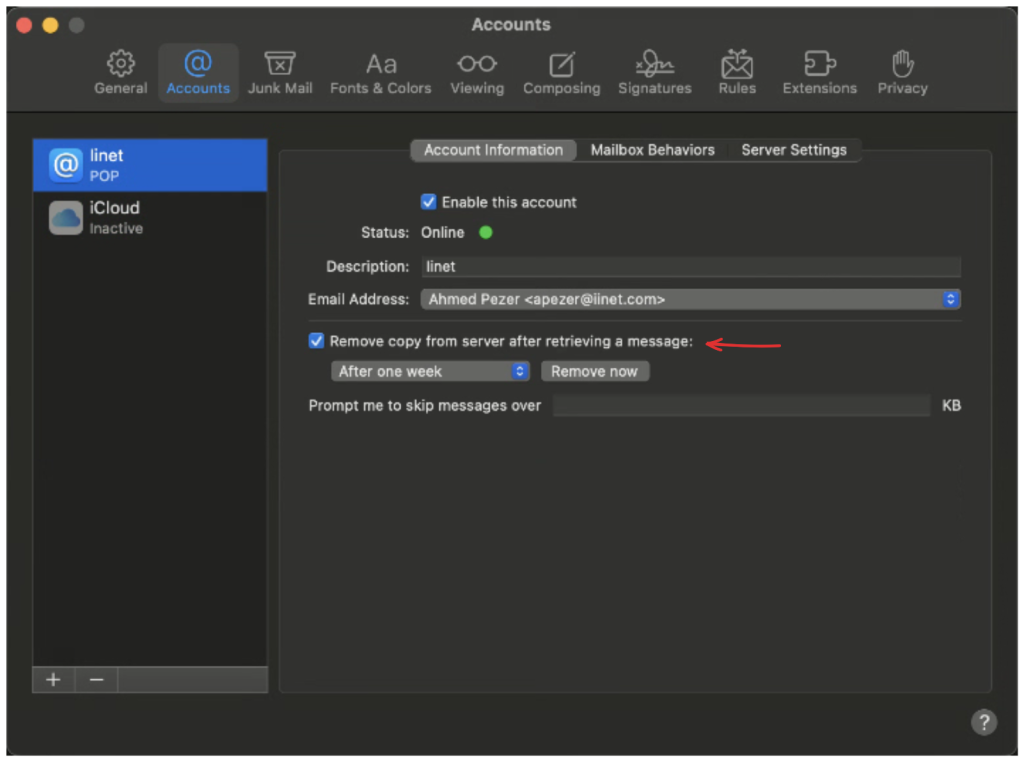
7. If you selected POP. Go back under the Accounts tab on top left while making sure the newly added email is selected on the left (square box) > Then select the Account Information tab > uncheck the box for “Remove copy from server after retrieving a message:”
** Note: It will only display “iinet” in the square box on the left if your email ends in @iinet.com. If you have an email ending in @pacifier.com or one of our other email addresses, it will display that instead.
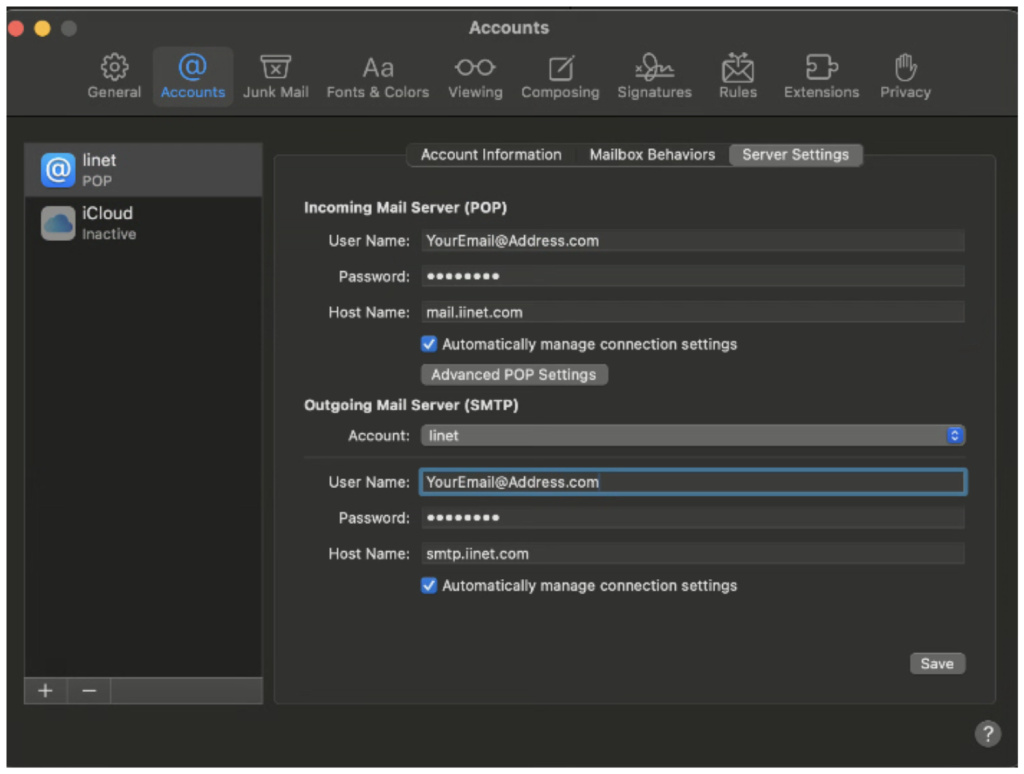
8. Lastly, you will need to double check your configuration settings in the Server Settings tab and fill in the information below: Incoming Mail Server (POP or IMAP): – User name: your full email address – Password: your password – Host name: mail.iinet.com Outgoing Mail Server(SMTP): – User name: your full email – Password: your password – Host Name: smtp.iinet.com Save
For companies that have their own domain and only need basic POP or IMAP email service (Web mail included).
**July 2023 Update** If you are experiencing issues with your email, please check the following server settings and make sure it says ‘bluetie’ instead of ‘easystreetemail’ in the respective POP/IMAP, and SMTP fields. EX: ‘pop.bluetie.com’ NOT ‘pop.easystreetemail.com’
587 or 465 If you have trouble sending email try: 25 or 5125 (preferred)
Authentication:
Required, use same settings as the incoming mail server.
Please note, we no longer offer direct support of smartphones. The above settings will allow you to receive your email on any smartphone or tablet device. For assistance configuring these devices please refer to the phone provider.
We have recently added a new interface to our management console to allow for setting of how long email is stored on the server in each respective folder.
We already had a setting for the “Spam” folder which is managed system wide at 30 days.
Previously we had a system wide setting of 180 days for “Deleted Messages” and the inbox for each mailbox on the server. This was disabled in 2021 following the acquisition back from Atmosera, this new feature was something we wanted to add to allow more control over mailboxes which is not in place.
What we have learned during the work developing this feature is that there are multiple variations of the Trash or Deleted items. We have see as many as five different names of folders which are all being used. The cause for this is due to the variety of mail programs in place. By this we mean Outlook, Mac Mail, Thunderbird, iOS Mail to name just a few. We have put a system wide default setting of 180 days on these folders
During this same project we discovered some additional folders that were created by mail programs
Junk – We believe this is an “Outlook” – System default now 30 days
Clutter – Another outlook specific folder
You can access the new email retention interface at, on this new interface you can set any folder except the Spam folder to any number of days you like as long as it is at least 30 days. The removal process will run at least weekly once we make it full operational.
If you have multiple mailboxes and are the admin of the account please click on “User Accounts” on the left side menu. If you don’t have that option click on “Email Retention” on the left side menu.
From the menu you can adjust how long you wish to save messages in those folders. If your account is setup for IMAP it will also remove it from your local computer as well unless you setup a local profile that is only stored on your computer and you move or copy the messages to your local computer.
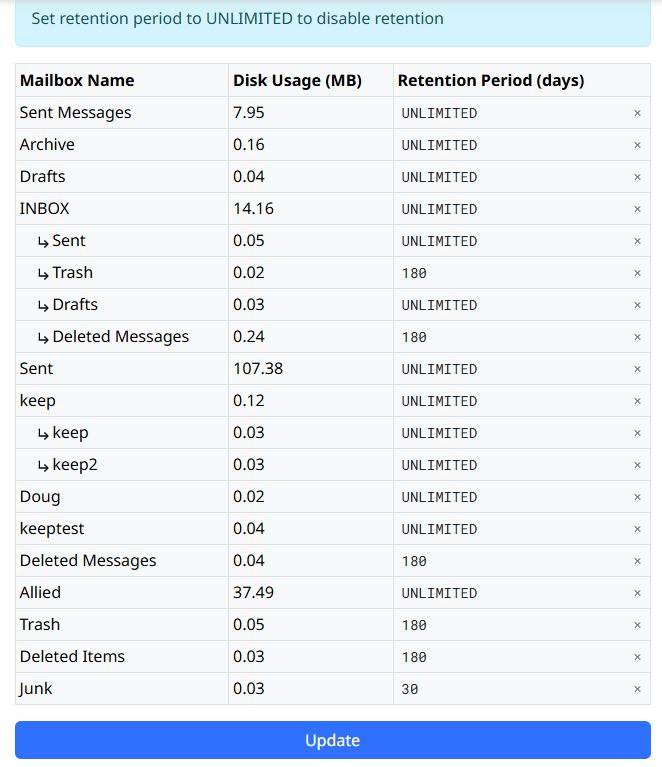
To change the number of days click the “x” on the right of the folder and type in the number of days you wish to have email kept in that folder. If you don’t want anything in that folder deleted type in “UNLIMITED”. Once you are done editing click “Update” at the bottom.
You likely will not have every single folder shown below, this is shown as an example only. The default settings we have in place are shown below, these can all be changed with the exception of the Spam folder.
Folder Name
Default Days
Inbox -> Trash
180
Inbox -> Deleted Messages
180
Deleted Messages
180
Trash
180
Deleted Items
180
Junk
30
Clutter
60
Spam (system managed)
30
Changes on this page will cause email on your computer to be removed unless you have created offline separate folders.
Infinity Internet email accounts include addresses with domains of @iinet.com, @pacifier.com, @proaxis.com, @tstonramp.com and other legacy domains. These accounts can be accessed with POP or IMAP using an email client, or using the webmail tool.
Server Settings:
POP Server:
mail.iinet.com
POP Port:
995
SSL/TLS:
on
SMTP Server:
smtp.iinet.com
SMTP Port:
587
SSL:
Required (Auto)
SMTP Auth.:
Required, use same settings
as the incoming mail server.
** Please note, we no longer offer direct support of smartphones. The above settings will allow you to receive your email on any smartphone or tablet device. For assistance configuring these devices please refer to the phone provider.
Syncing Emails to Gmail Syncing Emails to Gmail – We recommend syncing and downloading your emails to a Gmail account instead of forwarding them, as we do not recommend setting up other types of forwards as they hurt our Spam reputation by bypassing our filters causing the destination server of your email to think we are a Spamming them.
NOTE: If you are using a ‘POP’ or ‘IMAP’ account you will need to set up a new account as an Exchange account. If you have a ‘POP’ account set up, do not remove it as this may effect the emails you currently have on your device. Instead you will set up a new Exchange account alongside your POP account on the device. If your account is set up as an ‘IMAP’ account you may remove the account and set up a new account as an Exchange account with the directions below.
If you experience issues with your account after the end of September, try removing the Exchange account and adding it back.
Setup Steps
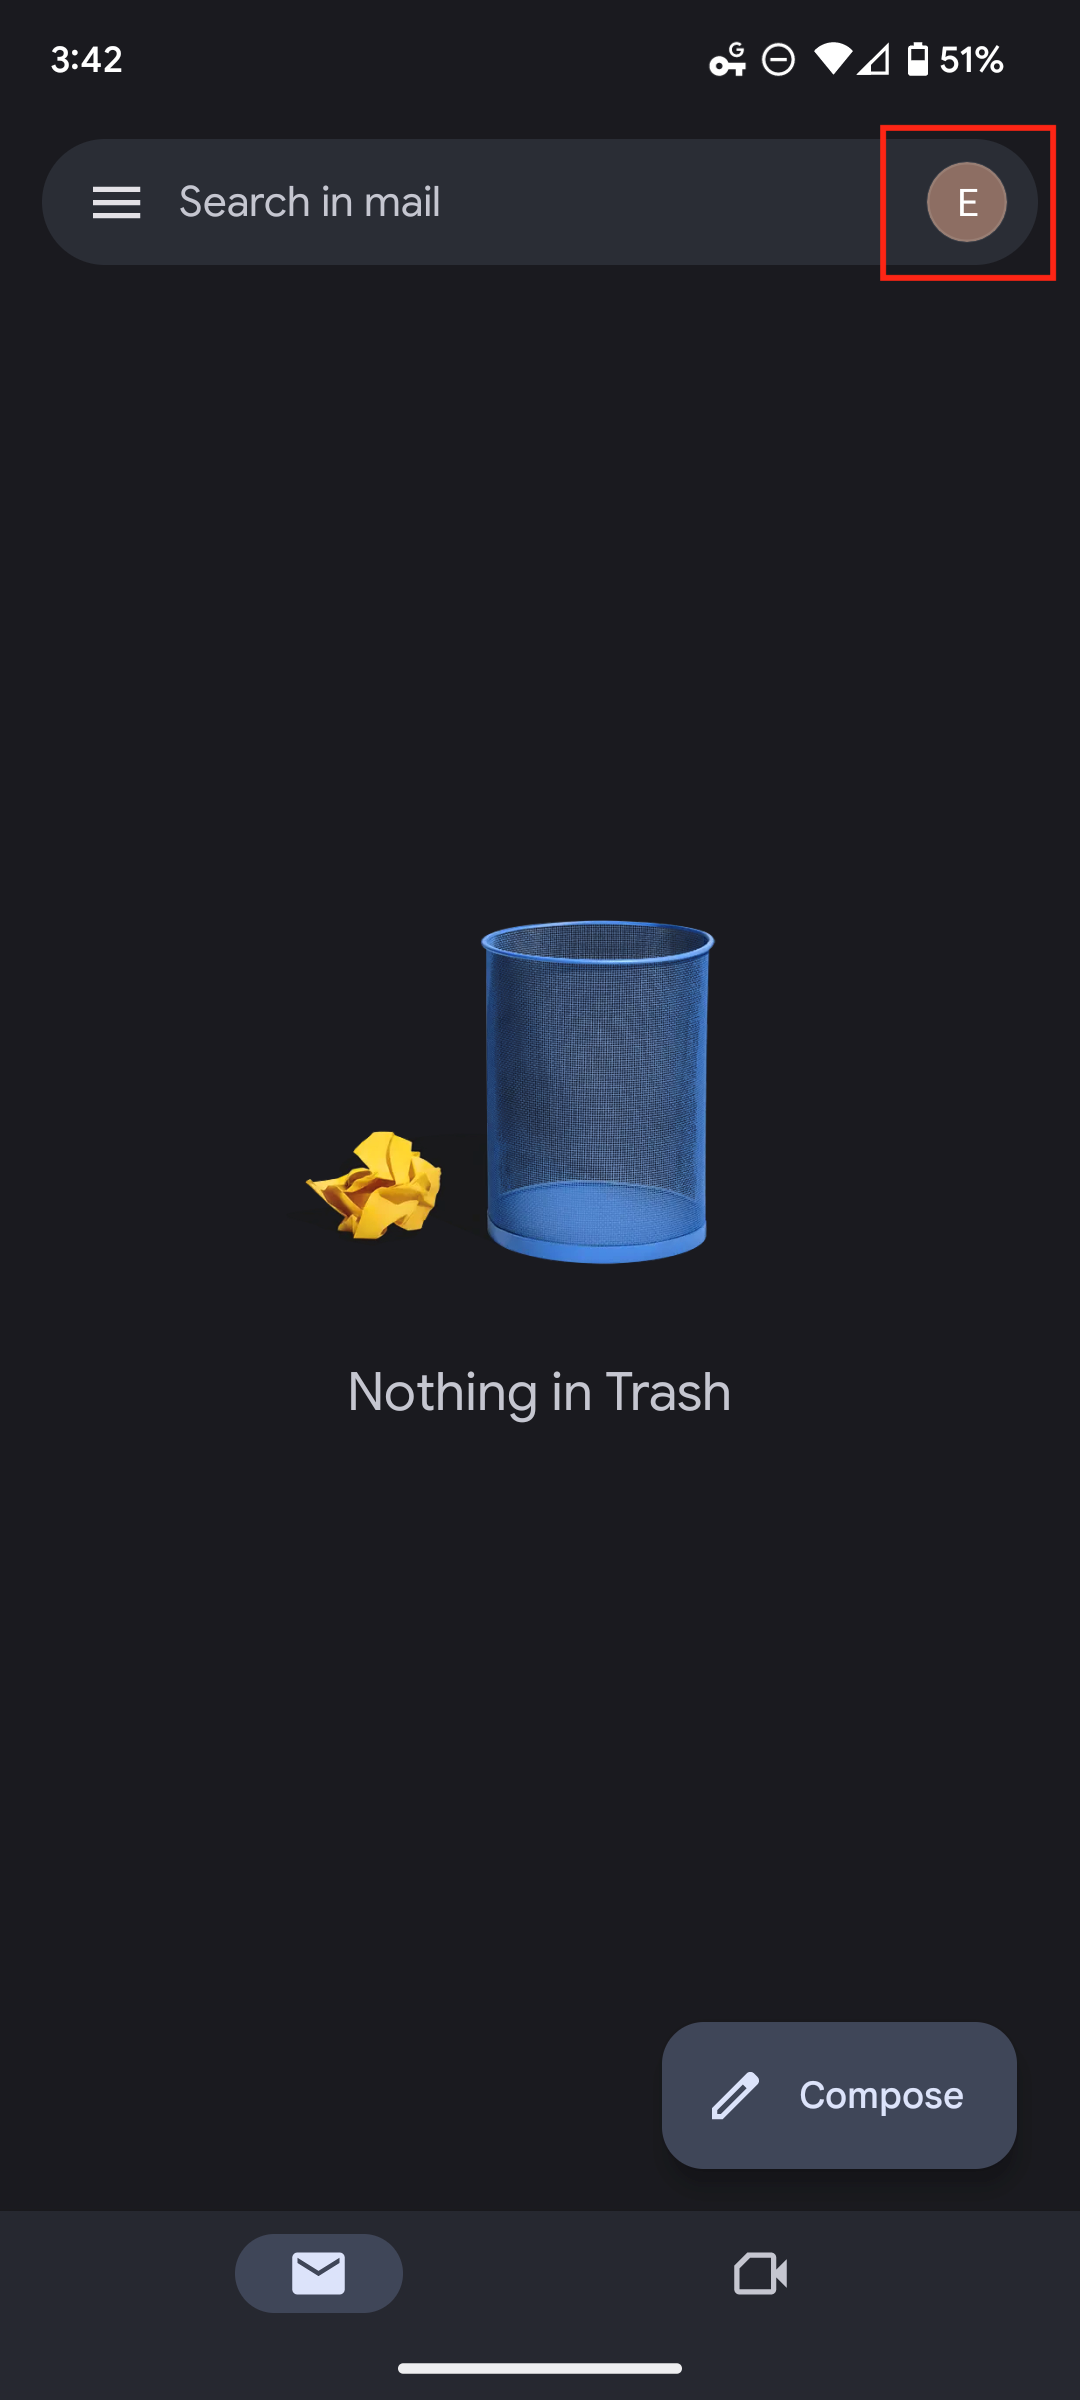
To set up your Easystreet account on Android, open up the Gmail app and click on the circle icon at the top right corner.
Now click on “Add another account”.
Finally, click on “Exchange and Office 365” or just “Exchange” if it shows up differently on your device.
And sign in by entering your email address and password. If it asks for the “Exchange Server”, input outlook.office365.com and proceed.
This tutorial is for users with @easystreet.net email accounts who are experiencing password errors from Microsoft’s disabling of Basic Authentication. If you find that you are experiencing issues after making the change, you may need to enable cookies.
Open Thunderbird
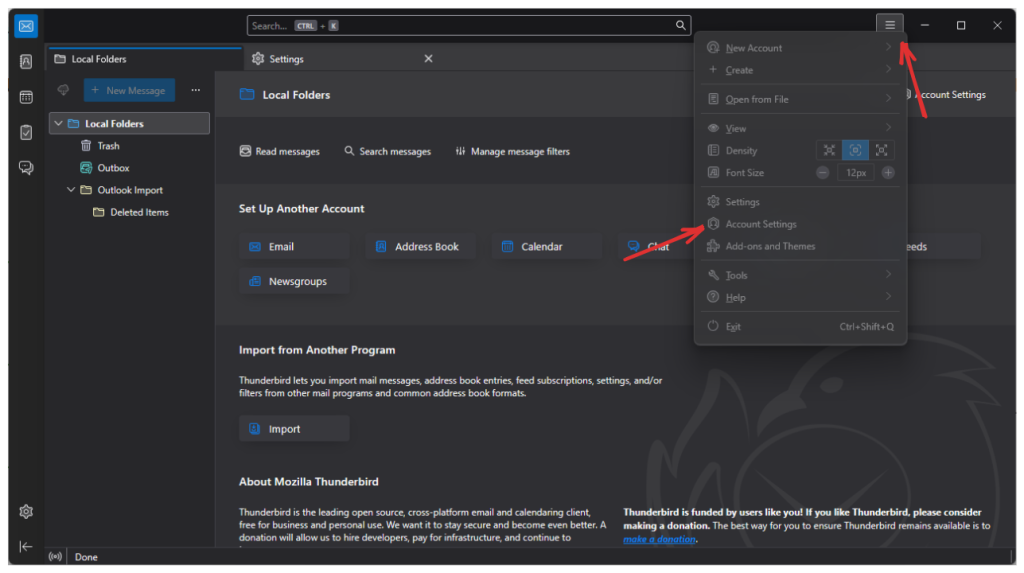
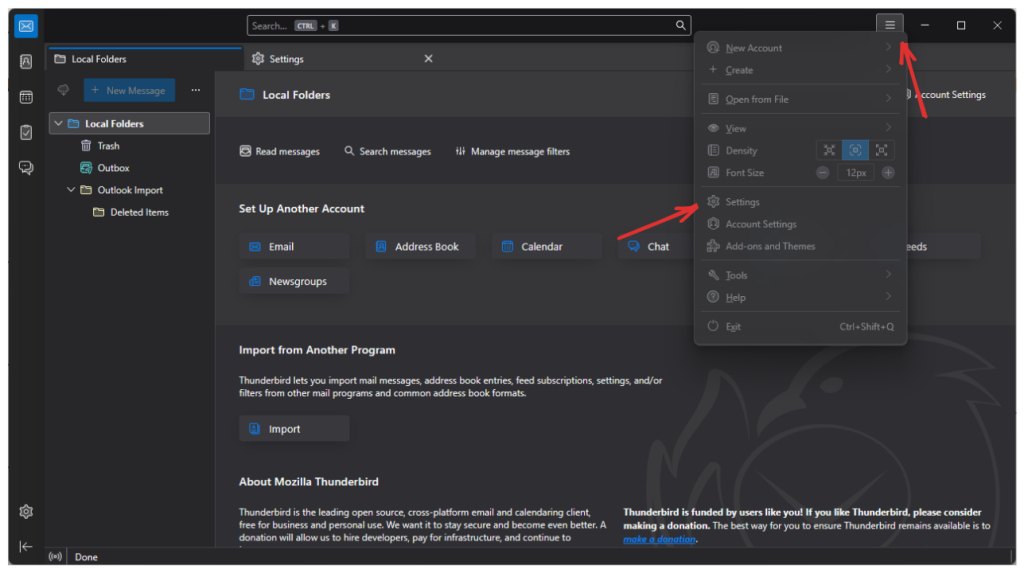
Select the 3 dashed lines from the top right corner of the screen, just under the “x” button. Then select “Account Settings”.
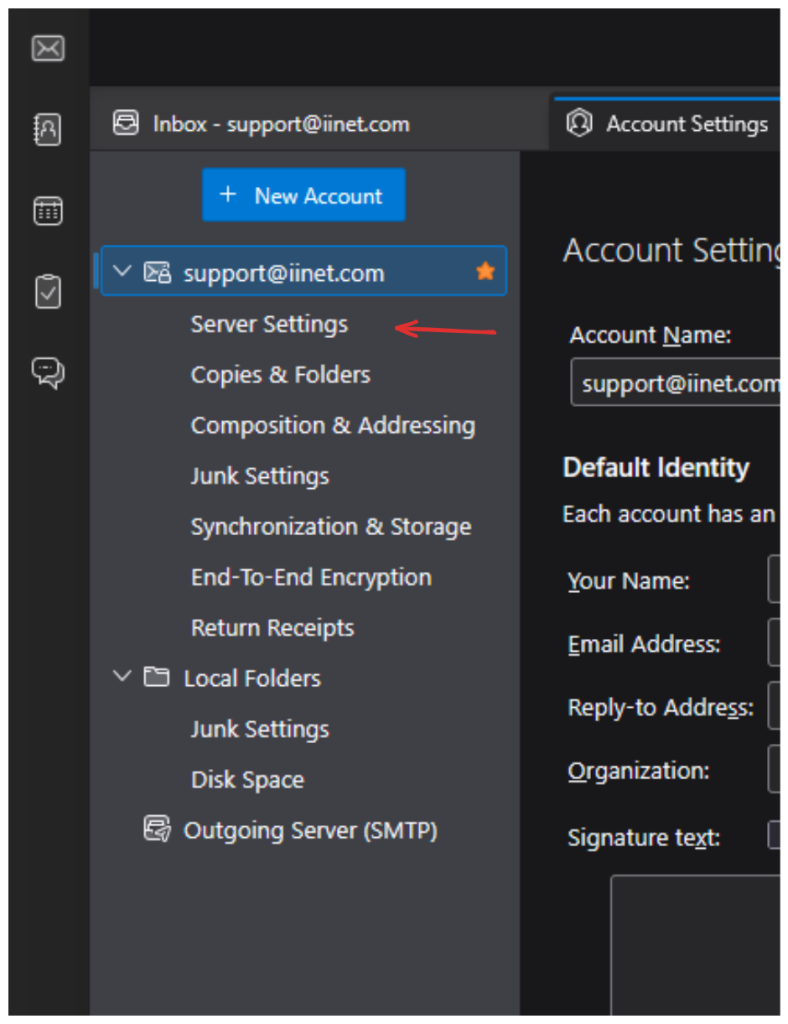
3. On the left-hand side select the “Sever Settings” for the affected email
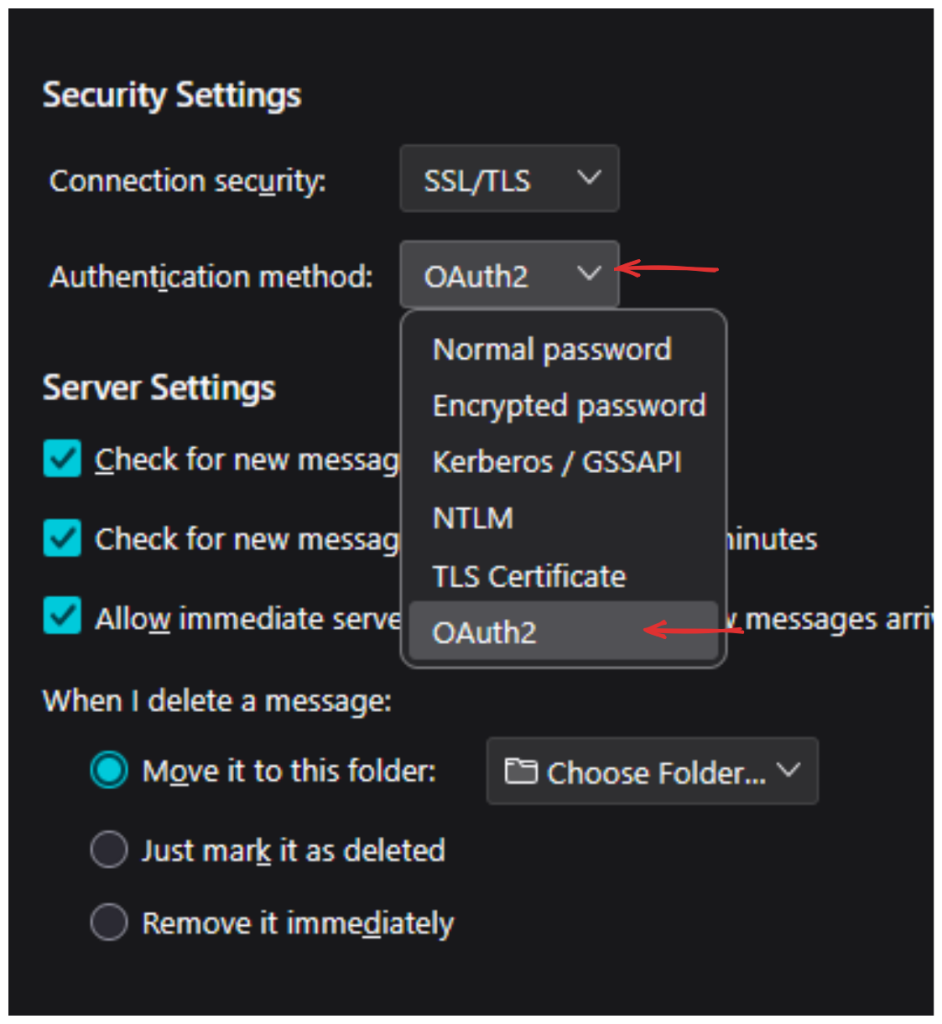
4. Next, change the authentication method to OAuth2. Thunderbird will auto-save your configuration setting changes. Security Settings > Authentication method > OAuth2
To Enable Cookies:
If you followed the tutorial above and are still experiencing issues with your email, you may need to enable cookies
1. In Thunderbird, click on menu hamburger > Settings (may be called ‘Preferences’ depending on version).
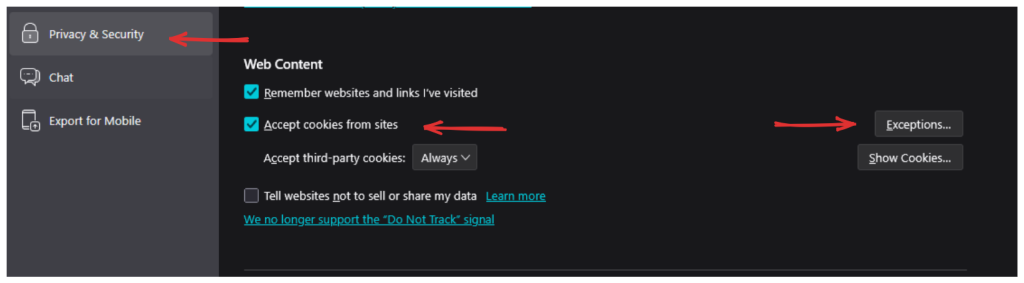
2. Select “Privacy & Security” on the left-hand side. Under ‘Web Content’, to the right of the checkbox labeled “Accept Cookies from Sites” (which is NOT checked) there is a button labeled “Exceptions…” > Click that Exceptions button.
3. In the resulting popup, under “Address of Website:” enter (without quotes “https://login.microsoftonline.com“, then click “Allow”. Lastly, click “Save Changes”
6. Restart Thunderbird, and then your email should be working.
This tutorial is for users with @easystreet.net email accounts who are experiencing password errors from Microsoft’s disabling of Basic Authentication. When setting up the Exchange account, if you previously had the email signed in as ‘POP’, please do not delete the email. Doing so may cause you to lose emails that have been downloaded to your device, instead login as if you are setting up a new account. If your account is set up as an ‘IMAP’ account you may remove the account and set up a new account as an Exchange account with the directions below.
What version am I using? If you are unsure of which version of Outlook you are using, you can check by opening your Outlook app and going to: File > Office Account > About Outlook > your version of Outlook should be listed at the top and look something like the image below.
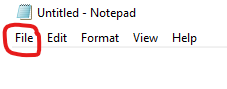
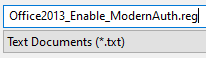
To enable modern authentication download the below file and change the ending from .txt to .reg and save the file somewhere you can easily find it. To rename from .txt to .reg open the file (should open with Notepad) and click on “File” at the top left of the text file and select “Save as” and add “.reg” at the end of the filename, without quotes, and click “Save”.
After you’ve downloaded the file, replaced .txt with .reg, and saved it in a location you can find, close Outlook. After Outlook is closed go ahead and double click on the .reg file you just downloaded and renamed. It will open up a dialog box. Select “Yes” when asked to allow the app to make changes and select “Yes” when asked to accept the changes. After running the file you must restart your computer.
After restarting your computer your Outlook should be set up to use modern authentication and no further action is required on your part.
You’re all set!
NOTE: If you are not comfortable making these changes please contact us or another computer professional to assist you. These changes need to be made as soon as possible, ideally before the start of October.
Setting up as a Microsoft Exchange Account
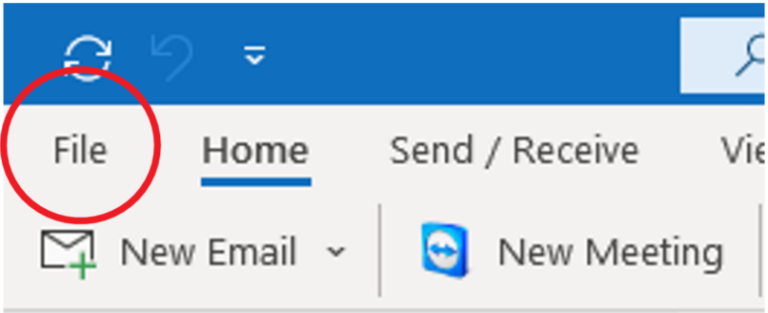
From the start menu open the Outlook app. Then, select ‘File’ on the top left corner of the screen.
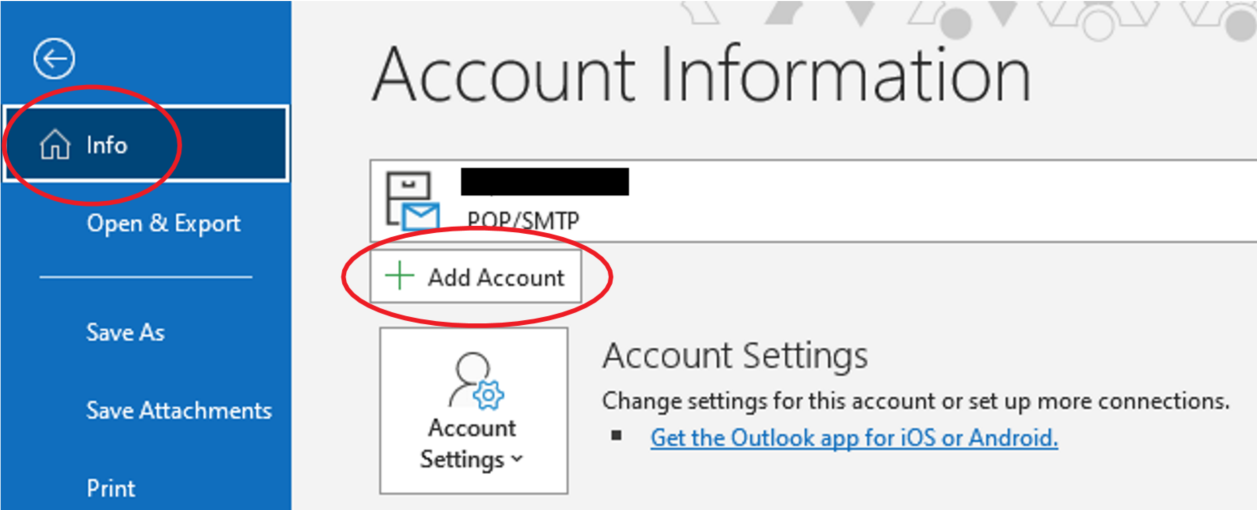
Select Info > Add Account
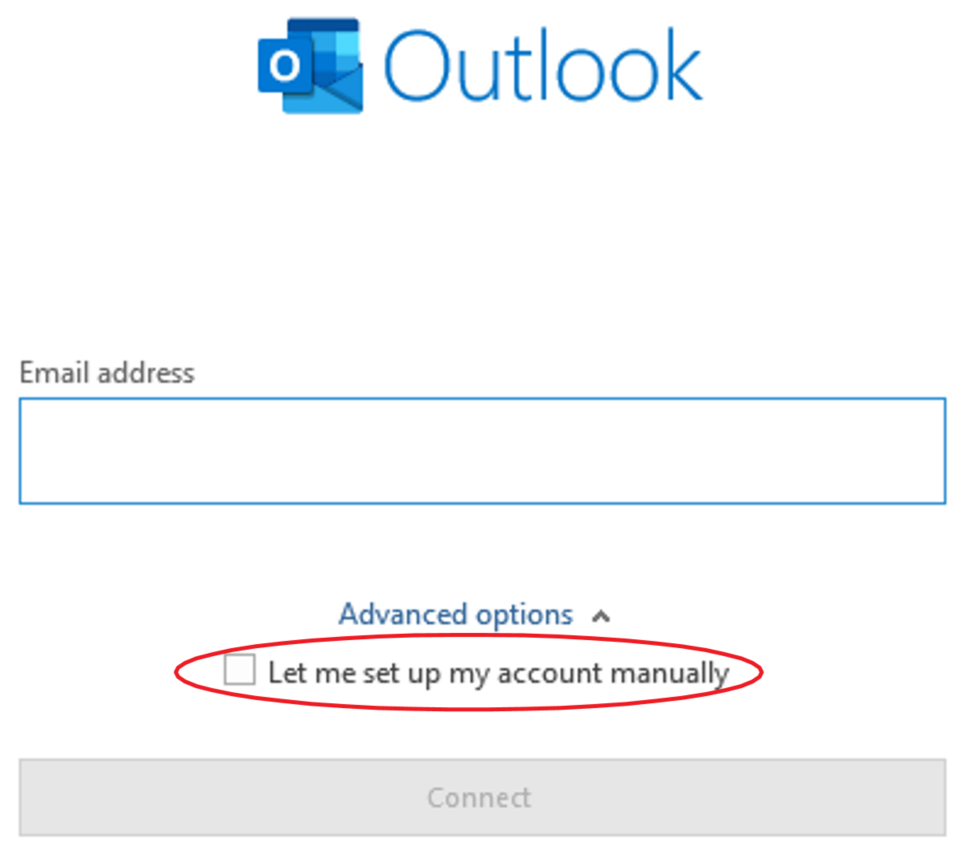
A pop up will appear: 1. Insert your email address 2. Click on ‘Advanced options’ and check the box for ‘Let me set up my account manually’ 3. Select ‘Connect’
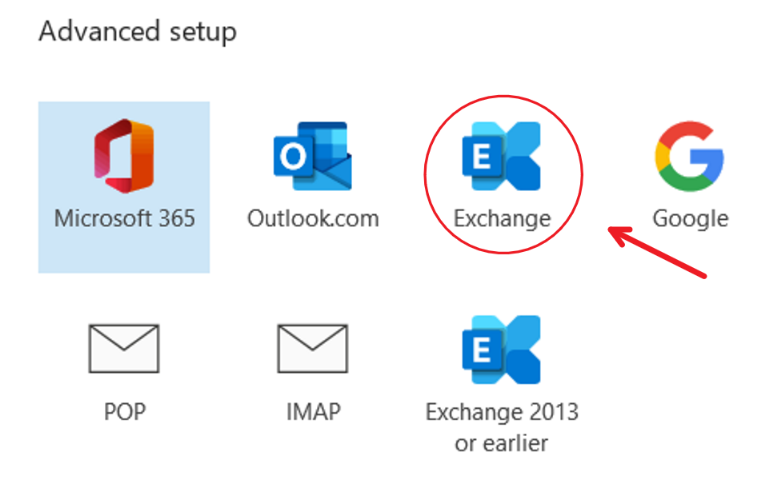
Select “Exchange”. If you are using an older version of Outlook this will not work. Please setup as IMAP if you are experiencing issues.
This tutorial is for users with @easystreet.net email accounts who are experiencing password errors from Microsoft’s disabling of Basic Authentication. When setting up the Exchange account, if you previously had the email signed in as ‘POP’, please do not delete the email. Doing so may cause you to lose emails that have been downloaded to your device, instead login as if you are setting up a new account. If your account is set up as an ‘IMAP’ account you may remove the account and set up a new account as an Exchange account with the directions below.
What version am I using? If you are unsure of which version of Outlook you are using, you can check by opening your Outlook app and going to: File > Office Account > About Outlook > your version of Outlook should be listed at the top and look something like the image below.
Enable/Force Modern Authentication (OAuth2) for Outlook 2016 and Newer
To enable/force modern authentication for Outlook 2016 download the below file and change the ending from .txt to .reg and save the file somewhere you can easily find it. To rename from .txt to .reg open the file (should open with Notepad) and click on “File” at the top left of the text file and select “Save as” and add “.reg” at the end of the filename, without quotes, and click “Save”.
After you’ve downloaded the file, replaced .txt with .reg, and saved it in a location you can find, close Outlook. After Outlook is closed go ahead and double click on the .reg file you just downloaded and renamed. It will open up a dialog box. Select “Yes” when asked to allow the app to make changes and select “Yes” when asked to accept the changes. After running the file you must restart your computer.
After restarting your computer your Outlook should be set up to use modern authentication and no further action is required on your part.
You’re all set!
NOTE: If you are not comfortable making these changes please contact us or another computer professional to assist you. These changes need to be made as soon as possible, ideally before the start of October.
Setting up as a Microsoft Exchange Account
From the start menu open the Outlook app. Then, select ‘File’ on the top left corner of the screen.
Select Info > Add Account
A pop up will appear: 1. Insert your email address 2. Click on ‘Advanced options’ and check the box for ‘Let me set up my account manually’ 3. Select ‘Connect’
Select “Exchange”. If you are using an older version of Outlook this will not work. Please setup as IMAP if you are experiencing issues.
This tutorial is for users with @easystreet.net email accounts who are experiencing password errors from Microsoft’s disabling of Basic Authentication. When setting up the Exchange account, if you previously had the email signed in as ‘POP’, please do not delete the email. Doing so may cause you to lose emails that have been downloaded to your device, instead login as if you are setting up a new account. If you have an IMAP account set up, you can delete it.
What iOS/iPadOS version am I using? Please check the version of your Apple device before proceeding. Make sure that you are updated to version 15.6 or newer, if your device is capable of updating. You can check this in “Settings > General > Software Update”.
As long as your iOS/iPadOS version is 15.6 or newer and your Easystreet account is set up as an Exchange account the account should automatically switch to modern authentication when the time comes. If you do experience issues starting January 1st 2023 and later, try removing the account and setting it back up as an Exchange account again to force modern auth.
Setting up as a Microsoft Exchange Account
From the main menu go to “Settings” and click on Apps > Mail > Mail Accounts > Add Account > Choose from a list.
Select “Microsoft Exchange”
Login with your username. Do not configure manually.
Select “Work or school account” and enter your password.